
Tools
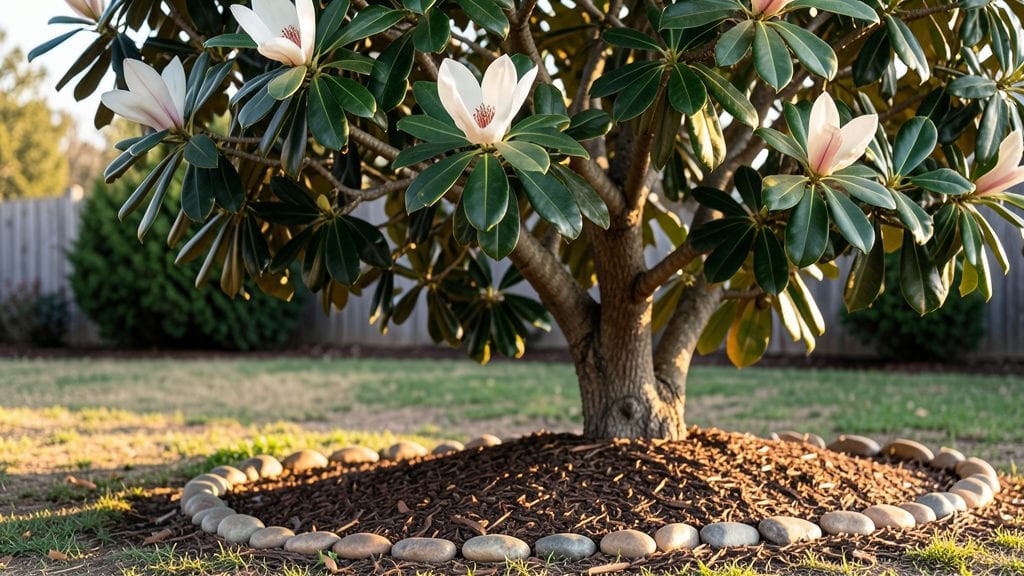
Creating a tree garden bed turns every inch of your yard into a layered masterpiece where trees become the stars of a vertical stage. 🌿 I started with a single ornamental cherry and surrounded it with dwarf conifers, perennials, and ground cover—now my small front yard feels like a lush forest without the space.
The key isn’t just planting trees; it’s designing each layer to play off the others, from canopy height down to the roots.
You’ll need a mix of dwarf varieties (like Japanese maples or columnar apple trees) that fit your bed’s height, plus companion plants that thrive in their shade. A 5-foot-deep bed gives roots room to breathe, while adding 3-4 inches of mulch keeps moisture in and weeds out.
The magic happens in the spacing: place taller trees at the back, mid-height shrubs in the middle, and low-growing perennials in front—like a living painting that grows over time.
By summer, you’ll have a textured, multi-level garden that blooms at different heights and seasons. The cherry’s spring blossoms contrast with the evergreen needles of the conifers, while the perennials spill over the edges like a green waterfall.
This design works for patio-sized beds or full landscape layers—just scale the plants to fit your space.
Fair warning: Pruning young trees keeps them shaped, and regular mulching prevents competition with ground plants. But once established, these beds require less work than traditional flower gardens—just enjoy the shade, wildlife, and that "forest retreat" vibe in your own yard. Let’s get layering!
📚 In This Guide
- What you need
- Instructions
- Tips and common mistakes
- Wrapping up and next steps
What you need
- ● Soil: 2–3 cubic yards of high-quality, well-draining garden soil (or a mix of topsoil and compost).
- ● Mulch: 2–3 bags of organic mulch (cedar or pine works best).
- ● Tree(s): 1–3 small, slow-growing trees (e.g., Japanese maple, dogwood, or crepe myrtle).
- ● Shrubs/Perennials: 3–5 low-maintenance shrubs or perennials (e.g., boxwood, hydrangeas, or ornamental grasses).
- ● Ground Cover: 1–2 bags of creeping thyme, ajuga, or ivy for texture.
- ● Garden Shovel (for digging).
- ● Wheelbarrow (to transport soil/mulch).
- ● Pruning Shears (for shaping plants).
- ● Rake (for leveling soil).
- ● Measuring Tape (to plan spacing).
- ● Watering Can/Hose (for hydration).
- ● Erosion control fabric (if soil is sandy/clay-heavy).
- ● Fertilizer (slow-release for long-term growth).
- ● Decorative rocks or edging (for a polished look).
- ● Drip irrigation system (for low-maintenance watering).
How to design a thriving tree garden bed in limited space
This layered approach maximizes vertical growth while keeping maintenance simple—ideal for small yards.
🪴 Step 1: Select and Prepare the Base Structure
Choose a raised bed frame at least 12 inches deep to accommodate root systems of your anchor plants. I prefer cedar for its natural rot resistance and aesthetic appeal. Construct or purchase a frame that's 4 feet wide—this width allows easy access to the center without compacting soil. Line the bottom with landscape fabric to prevent weeds from invading while still allowing water penetration.
Here's the thing—drainage is non-negotiable. If your yard has heavy clay soil, add a 2-inch layer of gravel at the base before filling with soil. This prevents waterlogging, which can rot roots of both trees and understory plants. Level the frame carefully so water doesn't pool in one corner during heavy rains.
🌱 Step 2: Build Soil Layers for Optimal Growth
Fill the bed with 4 inches of coarse wood chips as your bottom layer—this mimics natural forest floor decomposition while improving drainage. Next, add 6 inches of high-quality potting mix blended with 20% compost (I use worm castings for their gentle nutrient release). This fertile layer will support your understory plants while giving tree roots room to expand downward.
For the top 4 inches, use a 50/50 mix of potting soil and perlite—this keeps the surface loose for seedlings while preventing compaction. Water everything thoroughly before planting, but don't saturate it. You want the soil to feel like a damp sponge, not a soggy rag. This layering creates perfect conditions for both shallow-rooted plants and deeper tree roots.
☀️ Step 3: Plant the Vertical Layers Strategically
Start with your small tree saplings (3-4 feet tall) placed 18-24 inches apart at the bed's center. These become your canopy layer. I always choose slow-growing varieties like Japanese maple or dwarf fruit trees—they won't outgrow the space in 5 years. Dig holes just deep enough to accommodate the root ball, then backfill with native soil mixed with mycorrhizal fungi to boost root development.
Around the base of each tree, plant shrubs (like boxwood or hydrangea) 12 inches away from the trunk. These create your mid-layer. For the ground cover, use creeping thyme or ajuga—they spread quickly but stay low, preventing weeds while adding texture. Space these 6-8 inches apart so they'll fill in completely within a season.
💧 Step 4: Establish a Watering and Maintenance Routine
Water deeply twice weekly for the first month, then taper to once weekly once established. I use a soaker hose placed along the bed's perimeter to deliver moisture directly to roots without disturbing plants. The key is consistency—let the top 2 inches of soil dry out between waterings to prevent fungal issues. Mulch with 2 inches of shredded bark after planting to retain moisture and suppress weeds.
Fertilize lightly once in spring with a balanced 10-10-10 formula—too much nitrogen early on encourages leafy growth at the expense of root development. I skip fall fertilization entirely; the plants appreciate the winter rest. Prune any leggy growth on shrubs immediately, but leave tree pruning until late winter when the tree is dormant.
⏰ Step 5: Monitor and Adjust for Long-Term Success
Check the bed weekly for signs of stress—yellowing leaves on understory plants often mean the trees are competing for water. If you notice this, increase watering frequency slightly. The beauty of this design is that you can swap out plants as they mature. When your shrubs outgrow their space, replace them with perennials or bulbs that thrive in partial shade.
Every 3-4 years, top-dress with 1 inch of compost to replenish nutrients. This maintains fertility without overwhelming the system. I also rotate the soaker hose position annually to prevent soil compaction along one side. With proper care, this bed will look intentional and lush for decades—no matter how small your yard.
Tips & tricks for perfect tree garden bed design
These practical tips will help you create a thriving vertical garden that maximizes space while minimizing maintenance headaches.
Soil Layering Secret: When building your soil layers in Step 2, don't skimp on the 4-inch coarse wood chips layer—this is your drainage highway. I've seen gardeners use less, and within weeks, their trees develop root rot from poor drainage. For extra insurance, especially in clay-heavy soils, add a 1-inch layer of perlite to your bottom wood chips to create air pockets. This mimics natural forest floors perfectly and prevents that dreaded soggy soil feeling.
Tree Placement Precision: In Step 3, when positioning your small tree saplings, mark their locations with stakes before digging. The 18-24 inch spacing might seem generous, but trust me—crowding leads to competition that stunts growth. For dwarf fruit trees, I actually space them 22 inches apart to give their roots room to expand without fighting for nutrients. And here's a pro move: plant them slightly deeper than their nursery pots—this encourages stronger root development downwards.
Watering Wisdom: The twice-weekly watering routine in Step 4 is perfect, but timing matters just as much as frequency. Water in the early morning so foliage has all day to dry—this prevents fungal diseases that thrive in damp leaves. I set a reminder on my phone for 7 AM watering days to make it automatic. Also, after the initial two-week period, check soil moisture by sticking your finger 2 inches down—if it's dry, water; if damp, wait. This simple check prevents both underwatering and overwatering.
Long-Term Maintenance Hack: For that annual soaker hose rotation mentioned in Step 5, I create a simple system by marking hose positions with landscape edging stones. This visual cue reminds me to rotate positions without needing to remember which side was last. And for the 3-4 year compost top-dressing, I mix in a handful of mycorrhizal fungi powder with the compost—this gives your established plants a natural growth boost without disturbing their roots.
Pro Tips for Tree Garden Bed
- These practical tips will help you create a thriving vertical garden that maximizes space while minimizing maintenance headaches.
- Soil Layering Secret: When building your soil layers in Step 2, don't skimp on the 4-inch coarse wood chips layer—this is your drainage highway.
- Tree Placement Precision: In Step 3, when positioning your small tree saplings, mark their locations with stakes before digging.
Frequently asked questions
What’s the best time of year to plant a tree garden bed?
The ideal time is early spring or fall when temperatures are mild. This gives roots time to establish before extreme heat or cold. Avoid planting in summer—young trees struggle with drought stress, and winter planting risks frost damage. If you’re in a warm climate, late fall can still work!
How deep should the layers be in a tree garden bed?
Aim for 12–18 inches deep for most trees, but adjust based on root size. Smaller trees (like dwarfs or bonsai) need shallower layers (6–12 inches), while larger varieties benefit from deeper beds (18+ inches). Use organic matter like compost or mulch to fill gaps—this boosts drainage and nutrient retention.
Can I use a tree garden bed for edible plants like fruit trees?
Fruit trees, citrus, and berries thrive in layered beds. Just ensure the top layer has well-draining soil (mix in perlite or sand) to prevent root rot. Dwarf varieties are perfect for compact spaces—think apple, peach, or fig trees! Avoid heavy feeders like avocados unless your bed is extra deep.
What if my tree isn’t growing well in the bed?
Check for these issues:
Poor drainage? Add gravel or coconut coir to the bottom layer.
Too much shade? Prune nearby trees or move the bed to sunnier spot.
Pests or disease? Inspect leaves for signs (yellowing, spots) and treat with neem oil or fungicide.
Nutrient deficiency? Top-dress with compost or slow-release fertilizer.
Most problems fix with a little TLC!Are tree garden beds expensive to maintain?
Not necessarily! Initial costs (like fabric, soil, and mulch) add up, but long-term savings win:
- Less watering—layers retain moisture.
- Fewer weeds—mulch suppresses growth.
- Reusable materials—fabric and gravel last years.
Wrapping up and next steps
Creating a tree garden bed is a fantastic way to maximize space, boost biodiversity, and add stunning vertical beauty to your yard. Whether you're working with limited room or simply love the charm of layered greenery, this project is rewarding and sustainable—perfect for both beginners and green thumbs! 🌿
Ready to transform your outdoor space? Start small with a single layer or go bold with a full vertical garden. Grab your tools, gather your plants, and let your creativity grow! 🌱