Tools
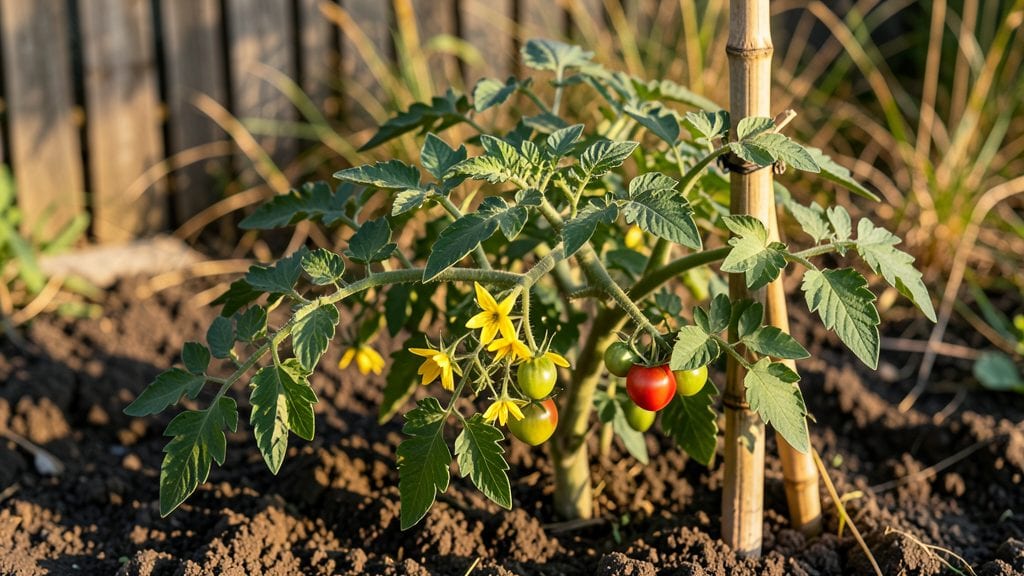
A backyard tomato garden transforms empty space into a sun-drenched harvest zone. 🌱 I’ve turned my narrow side yard into a productive tomato haven using containers, trellises, and clever spacing—proving you don’t need acres, just sunlight and smart planning.
The key is matching plant size to space, whether it’s a 5-gallon pot or a 4-foot raised bed.
Start with determinate varieties for bush-style plants or indeterminate vines that climb—both thrive in containers if you pick the right size. Add a sturdy trellis to save space and improve airflow, cutting disease risk while keeping fruit off the ground.
My favorite setup? A 5-foot-tall obelisk in the center of a 3-foot-wide raised bed, with companion plants like basil and marigolds tucked around the base.
By midsummer, you’ll be harvesting juicy beefsteaks and sweet cherry tomatoes that outperform store-bought. The plants grow lush and productive, and the vertical display adds charm to any backyard. Even in small spots, a well-planned tomato garden delivers bountiful results without the sprawl.
Works for balconies, patios, or tight backyards—just adjust the container size to the variety. Ready to turn your space into a tomato powerhouse? Let’s get growing!
📚 In This Guide
- What you need
- Instructions
- Tips and common mistakes
- Wrapping up and next steps
What you need
- ● Tomato plants: 1–3 plants (determinate for smaller spaces, indeterminate for bigger yields). Choose disease-resistant varieties like 'Cherry Tom,' 'Roma,' or 'Sungold.'
- ● Containers or garden bed: Containers: 5-gallon pots or larger (at least 12–18 inches deep). Use fabric pots for better drainage.
- ● Garden bed: Well-draining soil in a sunny spot (6+ hours of sunlight daily).
- ● Potting mix: High-quality, well-draining mix (avoid garden soil—it compacts easily). Add compost (1 part compost to 3 parts soil).
- ● Fertilizer: Balanced fertilizer (10-10-10) at planting.
- ● Tomato-specific fertilizer (5-10-10) every 3–4 weeks.
- ● Support system: Cages (5–6 ft tall) or stakes (6+ ft) for indeterminate varieties.
- ● Trellis or tomato clips for vining plants.
- ● Mulch: Straw or shredded leaves to retain moisture and suppress weeds.
- ● Watering can or hose with a gentle nozzle: Avoid wetting leaves to prevent disease.
- ● Pruning shears: For trimming suckers and dead leaves.
- ● Self-watering containers or drip irrigation for consistent moisture.
- ● Row covers or shade cloth to protect young plants from pests or extreme sun.
- ● Epsom salt (1 tbsp per plant monthly) for magnesium boost.
- ● Garden gloves and a kneeling pad for comfort.
- ● Harvest basket or mesh bag for easy picking.
Step-by-Step guide to designing your backyard tomato garden
Let’s turn that sunny corner into a thriving tomato patch—whether you’ve got a full plot or just containers.
🪴 Step 1: Choose Your Planting Method and Prepare the Space
Tomatoes thrive in full sun (6+ hours daily) and well-draining soil. For containers, select pots at least 12 inches deep and wide—each plant needs room to spread. If gardening in the ground, mark a 4-foot by 4-foot square per plant (or 3 feet apart in rows) to prevent overcrowding. Clear weeds, loosen soil to 12 inches deep, and mix in 2-3 inches of compost—this improves drainage and feeds roots.
Here’s the thing—if your soil drains poorly, add a 4-inch layer of coarse sand or perlite before planting. You’ll know it’s ready when water sinks in within 10 minutes, not pooling on top. For containers, fill them ¾ full with potting mix (never garden soil—it compacts and suffocates roots).
☀️ Step 2: Select and Plant Your Tomato Varieties
Pick determinate varieties (bush-type) for containers or small spaces—they stay compact and produce fruit all at once. Indeterminate types (vining) need cages or stakes and produce continuously but sprawl. Plant 4-6 seeds per pot or 1 transplant per container, burying the stem up to ⅓ of its height to encourage strong root growth. In the ground, space plants 18-24 inches apart in rows 3 feet apart. Water deeply after planting to settle soil around roots.
Don’t rush—wait until soil warms to 60°F (use a soil thermometer) before transplanting seedlings. Cold soil stunts growth. If starting from seed, sow ¼ inch deep and keep soil consistently moist until germination (7-14 days). Real talk: Overcrowding leads to weak stems and disease, so thin seedlings to the strongest 2-3 per pot once they’re 3-4 inches tall.
💧 Step 3: Water and Feed for Maximum Yield
Tomatoes need 1-2 inches of water weekly, but deep watering 2-3 times per week prevents shallow roots. Water at the base only—wet leaves invite fungal diseases like early blight. Use a soaker hose or drip irrigation to keep foliage dry. Mulch with 2-3 inches of straw or shredded leaves to retain moisture and suppress weeds. You’ll see faster growth and fewer blossom-end rot issues (a calcium deficiency caused by uneven watering).
Feed plants every 2-3 weeks with a balanced fertilizer (10-10-10) or tomato-specific feed once flowers appear. Look for dark green leaves and vigorous new growth—that’s your sign the plants are thriving. If leaves yellow between veins, it’s nitrogen deficiency; switch to a high-nitrogen fertilizer for a week. Avoid over-fertilizing, though—too much salt burns roots.
✂️ Step 4: Prune and Support for Bigger Harvests
Prune indeterminate tomatoes regularly to focus energy on fruit production. Remove suckers (the small shoots in the leaf axils) when they’re 2-3 inches long. Pinch off lower leaves up to 12 inches from the ground to improve airflow and reduce disease risk. For determinate types, minimal pruning is needed—just remove diseased or yellowing leaves. Use cages or stakes to support vines; tie stems gently with soft plant ties every 6-8 inches as they grow.
Here’s where it gets fun—watch for first flowers (usually 4-6 weeks after planting). If flowers drop off without setting fruit, it’s often due to temperature stress (below 55°F) or lack of pollinators. Give the plant a gentle shake daily to encourage pollination, or use a small paintbrush to transfer pollen between flowers. You’ll know it’s working when you see tiny green tomatoes forming within 2 weeks.
🌿 Step 5: Harvest and Extend the Season
Harvest tomatoes when they’re fully colored (red, yellow, or purple, depending on variety) and slightly soft to the touch. Twist gently to avoid damaging the vine. Indeterminate varieties produce continuously—pick regularly to encourage more fruit. For determinate types, expect a 2-3 week harvest window. Store ripe tomatoes at room temperature (not in the fridge—they lose flavor).
Extend your harvest by pruning back vines after the first frost or when leaves yellow. You’ll often get a second flush of fruit from new growth. Save seeds from heirloom varieties by scooping them out of ripe tomatoes, fermenting the pulp for 2-3 days, then rinsing and drying them. This is the moment that matters: a late-season bounty when most gardens have gone quiet.
Tips & tricks for perfect backyard tomato garden
A few game-changing strategies that'll transform your tomato patch from decent to extraordinary—no matter how limited your space.
Soil Prep Secret: The 10-minute water test in Step 1 is non-negotiable for container gardeners. If your potting mix drains too quickly (water disappears in under 2 minutes), mix in 1 part coconut coir to 3 parts potting mix—this improves moisture retention without suffocating roots. For in-ground planting, consider a 5-gallon bucket of compost worked into your 4-foot square to boost microbial activity.
Temperature Matters: That 60°F soil temperature in Step 2 isn't just a suggestion—it's the sweet spot for root growth. If your spring soil runs colder, use black plastic mulch laid 2 weeks before planting to warm it faster. For containers, place pots on brick or cinder blocks to prevent heat loss from cold ground. And remember: 55°F nights can cause blossom drop—cover plants with frost blankets if night temps dip below this threshold.
Pruning Precision: When removing suckers in Step 4, use clean, sharp pruners to avoid tearing stems. I've found that pinching suckers at 2 inches (not 3) creates less stress on the plant while still directing energy to fruit production. For indeterminate varieties, maintain 3 main stems—this balances air circulation with yield potential. And here's what nobody tells you: Prune in the morning—wounds heal faster when humidity is lowest, reducing disease risk.
Harvest Hack: The "slightly soft to the touch" guideline in Step 5 can be tricky with heirloom varieties. For these, look for a slight give at the stem end combined with full color development. To extend harvest windows, use paper bags over green tomatoes—ethylene gas from the fruit itself will speed ripening in 3-5 days. And if you're dealing with determinate varieties, harvest every other day during peak season to prevent overripe fruit from splitting.
Pro Tips for Backyard Tomato Garden
- A few game-changing strategies that'll transform your tomato patch from decent to extraordinary—no matter how limited...
- Soil Prep Secret: The 10-minute water test in Step 1 is non-negotiable for container gardeners. If your potting mix d...
- Temperature Matters: That 60°F soil temperature in Step 2 isn't just a suggestion—it's the sweet spot for root growth...
Frequently asked questions
Got questions about growing tomatoes in small spaces? You’re not alone! Here are answers to the most common queries—whether you're a first-timer or a seasoned gardener looking to optimize your backyard tomato garden.
How soon can I expect tomatoes to grow after planting?
With proper care, you’ll see tiny tomatoes (about the size of a grape) 60–70 days after transplanting seedlings. Full-sized, ripe tomatoes typically appear 75–90 days later, depending on the variety. Determinate types (like cherry tomatoes) may fruit faster than indeterminate varieties, which keep producing all season.
Can I grow tomatoes in containers year-round?
Not quite! Tomatoes thrive in warm weather (60–85°F) and need 6–8 hours of sunlight daily. In colder climates, move containers indoors near a sunny window or use a greenhouse. In frost-prone areas, start seeds indoors 6–8 weeks before the last frost and transition outdoors gradually. Pro tip: Use grow lights if natural light is limited.
What’s the fastest way to fix common tomato problems?
- Blossom end rot: Crushed eggshells or calcium supplements in soil prevent this. Water consistently to avoid soil moisture swings.
- Pests (aphids, hornworms): Spray with neem oil or introduce ladybugs. Handpick hornworms (they’re easy to spot!).
- Yellow leaves: Check for overwatering (root rot) or underwatering. Ensure containers have drainage holes.
Are there low-maintenance tomato varieties for beginners?
Try these disease-resistant, compact varieties:
- ‘Tiny Tim’ (cherry, 18" tall)
- ‘Patio Princess’ (bush, 24" tall)
- ‘Sungold’ (sweet, prolific)
- ‘Roma’ (great for sauces, determinate)
How do I extend the tomato season in hot climates?
Heat stress (above 90°F) can stunt growth. Try these tricks:
- Use shade cloth (30–50%) during peak afternoon sun.
- Mulch with straw or wood chips to keep roots cool.
- Water deeply in the morning to avoid evaporation.
- Choose heat-tolerant varieties like ‘Heatmaster’ or ‘Solar Fire.’
Wrapping up and next steps
Growing your own backyard tomato garden—even in containers or small spaces—is a rewarding journey that brings fresh, flavorful harvests right to your doorstep. 🍅 Whether you're a beginner or a seasoned gardener, the key is patience, consistency, and a little creativity with space.
With the right tools, techniques, and a dash of sunshine, you’re well on your way to enjoying homegrown tomatoes that outshine store-bought varieties.
Ready to take the next step? Start small—plant a single container or a few seeds—and watch your confidence (and tomato plants!) grow. Before you know it, you’ll be sharing your bounty with friends or savoring homemade sauces and salads. Happy gardening! 🌱