Landscaping
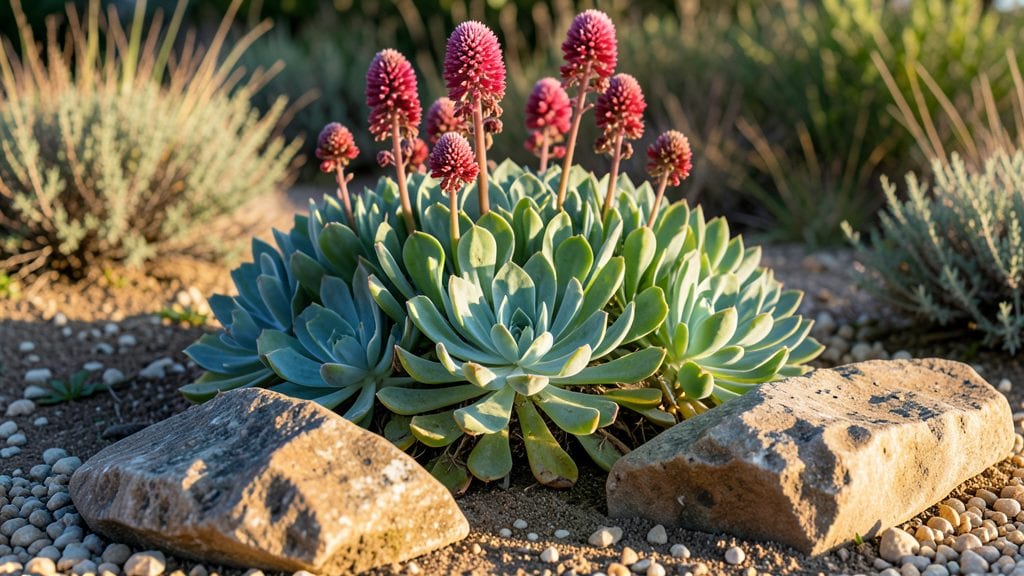
Exploring rockery garden ideas turned my eroding backyard into a layered masterpiece—now it’s a dramatic, low-maintenance landscape with cascading plants and rocks, all built after years of springtime erosion. 🌿 that catch the light. The key is balancing structure with organic movement, so it never looks stiff or artificial.
Start with a sturdy base: large boulders anchor the design while smaller stones fill gaps, creating pockets for alpine plants and succulents. Drainage is non-negotiable—rockeries hate soggy roots, so use gravel or broken stone at the bottom.
For small spaces, even a single tier with creeping thyme or sedum adds texture without overwhelming the area.
By summer, your rockery will hum with life: silvery foliage spilling over edges, delicate blooms peeking from crevices, and grasses swaying like wind chimes. The best part? Once established, it thrives on neglect—just occasional weeding and deadheading keeps it looking intentional, not high-maintenance.
Whether you’re going for a Zen-inspired Japanese garden or a wild, cottage-style scramble, the principles stay the same: play with heights, contrast textures, and let plants spill naturally. Ready to turn rocks into a garden that feels like it’s been there forever?
📚 In This Guide
- What you need
- Instructions
- Tips and common mistakes
- Wrapping up and next steps
What you need
- ● Rocks & Stones: 10–50 lbs of varied-sized rocks (smooth river rocks, slate, or granite for texture). Aim for a mix of large foundation stones (12"+) and smaller accent rocks (2–6").
- ○ Optional: Painted rocks (for whimsical themes) or local field stones (for a natural look).
- ● Soil & Growing Medium: 5–10 cubic feet of well-draining soil mix (combine 60% topsoil, 30% coarse sand, and 10% perlite or pumice).
- ○ Optional: Slow-release fertilizer (like osmocote) or mycorrhizal fungi for root health.
- ● Plants: 3–5 low-growing perennials (e.g., sedum, heuchera, or thyme).
- ● 1–3 trailing plants (e.g., ferns, creeping phlox, or ajuga).
- ○ Optional: Moss sheets (for a lush, green carpet) or air plants (for modern minimalism).
- ● Must-Haves: Garden shovel & trowel
- ● Wheelbarrow or bucket (for hauling rocks/soil)
- ● Level & measuring tape
- ● Garden gloves & knee pads
- ● Hose with spray nozzle (for rinsing rocks)
- ● Nice-to-Haves: Rubber mallet (for positioning large rocks)
- ● String line & stakes (to mark layouts)
- ● Pruners (for shaping plants)
- ● Safety glasses (if cutting stone)
- ● ✅ A sunny to partially shaded spot (most rockeries thrive in 6+ hours of light).
- ● ✅ A flat or gently sloped base (grade gently for drainage; avoid low spots where water pools).
- ● ✅ Access to water (a drip irrigation line or soaker hose works best).
- ○ Optional: A permeable landscape fabric (to prevent soil erosion between rocks).
How to design a stunning rockery garden with natural flow
Transform a sloped or uneven space into a dynamic, layered rockery that thrives with minimal maintenance.
🪴 Step 1: Assess and Prepare the Site
Start by evaluating the terrain—rockeries work best on slopes, hillsides, or areas with natural elevation changes. Clear debris, weeds, and loose soil down to 6-8 inches deep to create a stable foundation. I like to mark the outline with spray paint before digging, as this prevents over-excavation that can destabilize the structure later.
For slopes over 3 feet tall, consider terracing to prevent erosion and create distinct planting levels. Each terrace should be 12-18 inches wide at the top and slope gently outward to channel water away from the base. Use a level to ensure each tier is perfectly horizontal—this is critical for long-term stability.
☀️ Step 2: Build the Structural Framework
Begin by placing the largest rocks along the base and edges to anchor the design. These should be 12-18 inches in diameter and positioned with their flat sides facing outward to create natural steps. I arrange them in a staggered pattern, leaving 3-4 inches of space between each rock—this gap will later be filled with smaller stones and soil for drainage.
For steeper slopes, interlock larger rocks like stepping stones to form a retaining wall effect. Use a rubber mallet to gently tap them into place until they’re stable. Avoid forcing rocks into position—if they don’t fit naturally, they’ll shift over time. This framework will support the cascading layers of plants and smaller stones you’ll add later.
🌱 Step 3: Layer Rocks and Soil for Drainage
Fill the gaps between rocks with a mix of ½ sharp sand and ½ small gravel to create a porous base. This layer prevents soil compaction and ensures excess water drains away from plant roots. I like to sift the mixture through a ¼-inch mesh screen—this removes large particles that could block drainage.
Next, add a 2-inch layer of high-quality potting mix to the gaps and terraces. Avoid garden soil—it compacts easily and suffocates roots. For slopes, create pockets of soil around the edges of rocks where plants will thrive. The goal is to mimic natural conditions where moisture and nutrients accumulate near rock surfaces.
🌿 Step 4: Select and Plant Drought-Tolerant Species
Choose plants that thrive in rocky, well-draining conditions. For cascading layers, I recommend sedum, sempervivum (hens and chicks), and creeping thyme—these spread naturally and require minimal water once established. Place taller varieties like lavender or Russian sage at the back of terraces, while trailing plants like ajuga or ice plant should spill over edges.
Dig small holes just deep enough to accommodate roots without burying the crown. Space plants 6-12 inches apart, depending on their mature size. Press soil gently around roots to eliminate air pockets, then water deeply to settle everything. Avoid overhead watering—it can dislodge rocks and wash away soil.
✂️ Step 5: Refine and Maintain for Long-Term Beauty
After planting, arrange smaller stones and pebbles around the base of plants to blend the rockery with the surrounding landscape. This creates a seamless transition and reduces weed competition. I like to use stones that match the color palette of the rocks—neutral tones like slate gray or sandy beige work universally.
Water deeply once a week for the first month, then taper off as plants establish roots. Once mature, most rockery plants need water only during prolonged dry spells. Prune leggy growth in early spring to encourage bushier habits, and remove spent flowers to redirect energy into root development. With time, your rockery will develop a self-sustaining ecosystem that requires little intervention.
Tips & tricks for stunning rockery gardens
Creating a rockery that flows naturally takes more than just placing rocks—it's about understanding subtle details that make all the difference.
Foundation Stability: When clearing soil to 6-8 inches deep in Step 1, resist the urge to dig deeper. The deeper you go, the more unstable your rockery becomes, especially on slopes. I've seen rockeries collapse after heavy rain because the foundation wasn't deep enough. Use a level to check each terrace's horizontal alignment—this prevents water pooling that can erode your hard work.
Rock Placement Technique: In Step 2, those 3-4 inch gaps between rocks aren't just for looks—they're drainage channels. I learned this the hard way when my first rockery had rocks too close together, leading to waterlogged soil. For steeper slopes, interlock rocks like puzzle pieces to create natural steps. This technique mimics how rocks settle naturally over time in mountain landscapes.
Drainage Layer Secrets: The ½ sharp sand and ½ small gravel mix in Step 3 needs to be sifted through a ¼-inch mesh screen—this isn't optional. Large particles can create drainage bottlenecks, causing water to pool around plant roots. I recommend using coarse builder's sand rather than play sand, as it compacts less over time. For extra insurance, add a layer of landscape fabric beneath your drainage mix to prevent soil from migrating downward.
Plant Spacing Strategy: When planting in Step 4, the 6-12 inch spacing might seem generous, but it's crucial for mature plant sizes. I've seen rockeries become overcrowded when plants outgrow their initial spacing. Place trailing plants like ajuga at the edges where they can cascade naturally, while upright varieties should go in the center of terraces. This creates that organic, flowing look that makes rockeries so appealing.
Pro Tips for Rockery Garden Ideas
- Creating a rockery that flows naturally takes more than just placing rocks—it's about understanding subtle details that make all the difference.
- Foundation Stability: When clearing soil to 6-8 inches deep in Step 1, resist the urge to dig deeper.
- Rock Placement Technique: In Step 2, those 3-4 inch gaps between rocks aren't just for looks—they're drainage channels.
Frequently asked questions
Got questions about creating a stunning rockery garden? You’re not alone! Here are some of the most common queries—plus straightforward answers to help you get started with confidence.
What’s the best time of year to build a rockery garden?
The ideal time is early spring or fall when temperatures are mild. This gives plants time to establish roots before extreme heat or cold sets in. Avoid winter (frozen ground) or peak summer (drought stress). If you’re in a warm climate, late fall works too!
Can I build a rockery on a slope or uneven ground?
Slopes and uneven terrain are perfect for rockeries—they create natural cascading layers. Start by marking the outline, then use retaining walls or large rocks to stabilize the base. Terraced levels help prevent erosion while adding visual drama. Just ensure proper drainage!
Are there budget-friendly alternatives to expensive landscaping rocks?
Yes! Skip pricey river rocks and try:
- Local field stones (often free or cheap from quarries)
- Recycled concrete or brick rubble (check with local suppliers)
- Slate or flagstone scraps (ask at stone yards)
- Natural logs or branches (for rustic texture)
How do I keep weeds from overtaking my rockery?
Weeds thrive in rocky gaps! Prevent them with:
- Landscape fabric under rocks (poke holes for drainage)
- Mulch (wood chips or gravel) between plants
- Regular inspections (pull weeds early before they seed)
- Ground covers like creeping thyme or sedum to crowd out invaders
Do rockeries need special soil or drainage?
Yes! Rockeries hate soggy soil. Use a well-draining mix:
- 50% garden soil
- 30% coarse sand or perlite
- 20% compost or peat moss
Wrapping up and next steps
Transforming your outdoor space with a rockery garden is all about blending creativity with nature—whether you’re crafting a dramatic cascading design or a serene textured terrace. The key is to start small, choose the right materials, and let plants thrive in their natural layers.
With a little planning and patience, your rockery will become a stunning, low-maintenance focal point that evolves over time.
Ready to get started? Sketch your design, gather your supplies, and take the first step today! 🌿✨ Your dream garden awaits—just add rocks and plants!