
How To
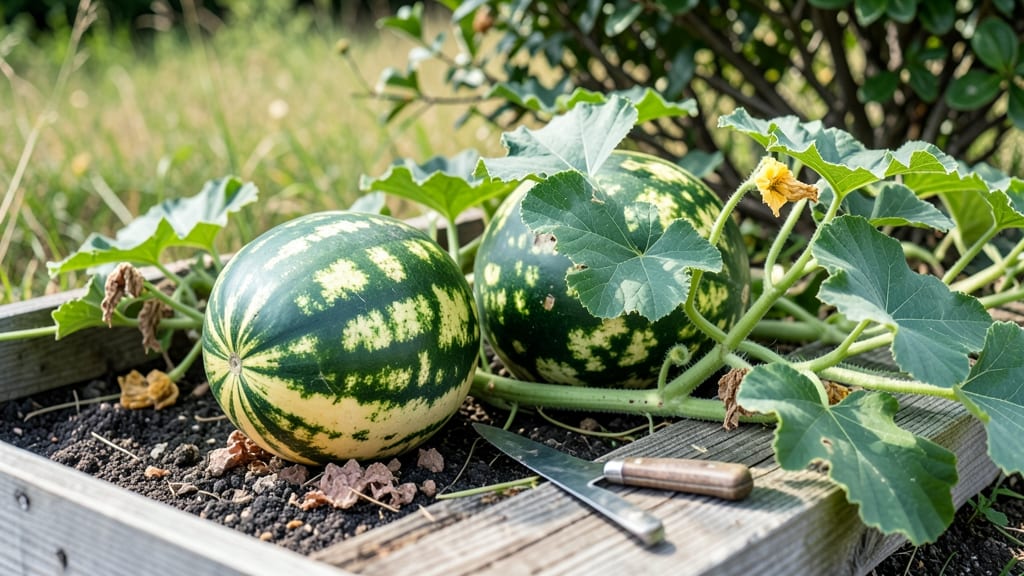
Knowing when to pick a watermelon from your garden means catching that sweet, juicy moment before it turns rock-hard or mushy—here’s how to spot the perfect time.
There’s nothing worse than slicing into a watermelon only to find it’s still rock-hard inside—or worse, mushy and overripe. The key is reading the 5 visual cues that scream "harvest me now," from the tendril turning brown to the rind deepening in color.
Your USDA Zone 6a climate plays a role too—warmer summers speed up ripening, while cooler areas may need an extra week to reach peak sweetness. I’ll walk you through the exact signs to watch for, plus how to test ripeness without cutting into it.
By the end, you’ll never second-guess when to pluck that 🍉 from the vine again—just sweet, ready-to-eat perfection every time.

5 Visual cues to determine watermelon ripeness (with photos)
Harvesting a watermelon at the perfect moment means the difference between a juicy, sweet slice and a watery, bland disappointment. While trial-and-error can work, relying on visual cues ensures you pick melons at peak ripeness. These five key signs will help you avoid both underripe and overripe mistakes every season.
First, pay attention to the rind color—this is your first clue. Mature watermelons develop a deep, uniform hue, whether it’s dark green, yellow, or striped, depending on the variety.
A pale or patchy rind means the melon needs more time on the vine. For example, Crimson Sweet should turn a rich, deep green, while Yellow Doll varieties will develop a golden-yellow skin.
Next, check the tendril near the stem. This curly vine, called the ground spur tendril, should turn brown and crispy when ripe. If it’s still green and flexible, the melon isn’t ready.
Pro tip: Gently tug on the tendril—if it snaps easily, the melon is likely ripe. This is one of the most reliable indicators gardeners swear by.
Now, examine the ground spot, the area where the melon rested on the soil. A ripe watermelon will have a creamy-yellow or white spot that contrasts with the rest of the rind.
If this spot is still green or pale, the melon needs more time. This cue is especially useful for heirloom varieties, where rind color can be less uniform.
The stem end also holds clues. When ripe, the stem near the fruit will feel dry and slightly shriveled, almost like it’s detaching from the vine. If the stem is still green and plump, the melon isn’t ready.
This is a critical sign, as overripe melons often separate easily from the vine, making them prone to rot.
Finally, give the melon a gentle shake. A ripe watermelon will produce a hollow, rattling sound when shaken, indicating the seeds have matured and the flesh is juicy.
If it sounds solid or dull, it’s not ready. This trick works best when combined with the other visual cues—never rely on it alone.
Here’s a quick reference to tie it all together:
| Visual Cue | Ripe Indicator | Not Ready Sign | Action |
|---|---|---|---|
| Rind Color | Deep, uniform hue (varies by variety) | Pale or inconsistent color | Wait 3-5 days |
| Tendril Near Stem | Brown, dry, and crispy | Green and flexible | Harvest in 2-3 days |
| Ground Spot | Creamy-yellow or white | Green or pale | Wait 4-7 days |
| Stem End | Dry and shriveled | Green and plump | Check in 5 days |
| Shake Test | Hollow, rattling sound | Solid or dull | Harvest if other cues match |
Avoid these common mistakes that lead to poor harvests. First, don’t harvest based on size alone—some varieties stay small but are perfectly ripe. Second, never cut into a melon to check ripeness; this damages the plant and wastes fruit.
Instead, use the visual cues above and combine them with the thump test (covered in the next section) for accuracy.
Regional climate plays a role too. In hotter zones, melons ripen faster, so monitor them daily during peak summer. In cooler climates, extend the timeline by 1-2 weeks.
For example, in Zone 9, melons may be ready by early July, while in Zone 5, you might not harvest until late August.
Once you’ve confirmed ripeness, cut the melon with a clean knife about 1-2 inches from the vine. Leave a
How to test watermelon ripeness beyond visuals: the thump, tap, and field tricks
When your watermelon looks ripe but you’re not sure, tactile tests and field tricks can save you from a disappointing slice. These methods go beyond color and tendrils to confirm true ripeness without damaging the fruit.
I’ve used these tricks for years in my garden, and they’ve never failed me—especially when dealing with tricky varieties like Sugar Baby or Crimson Sweet.
The most reliable tricks involve sound, touch, and stem checks—each giving you a different clue about what’s happening inside that thick rind. For example, a hollow-sounding thump or a dry stem can tell you more than any color chart.
Let’s break down the best ways to test ripeness like a pro, so you can harvest at the perfect moment every time.
- 1. The Thump Test: Tap the melon with your knuckles. A ripe watermelon will sound deep and hollow—like a drum. If it sounds dull, it’s not ready yet.
- 2. Stem Twist: Gently twist the stem end near the vine. If it comes off easily with a dry, papery texture, the melon is ripe. A green, sticky stem means it’s too soon.
- 3. Field Spot Check: Look for the cream-colored spot where the melon rested on the ground. When it turns yellowish or dull, the fruit is ready to harvest.
- 4. Tendril Dryness: The curly tendril near the stem should be completely brown and crispy. If it’s still green or slightly wilted, wait a few days.
- 5. Weight Test: Lift the melon—ripe watermelons feel heavy for their size. A lightweight melon is underripe, while an overly heavy one might be overripe.
My favorite trick is the field spot check, especially in hot climates where watermelons ripen quickly. The spot where the melon touches the ground often changes color first, giving you an early warning sign.
I’ve also found that combining the thump test with the stem twist gives the most accurate results—if both pass, you’re golden!
For those who love data, the weight test is surprisingly reliable. A ripe watermelon should feel dense, almost like it’s too heavy to lift for its size. This is because the seeds and flesh have fully developed.
Pro tip: If you’re growing seedless varieties, focus extra on the thump and stem tests, as their weight might not vary as dramatically.
One mistake I see often is relying only on rind color. Some varieties stay green until they’re overripe, while others develop stripes or patterns before they’re ready. That’s why I always use at least two of these methods together—like the thump test and tendril check—to avoid surprises.
Over the years, this combo has saved me from countless underripe or mushy melons.
If you’re harvesting in hot, dry weather, watermelons can ripen faster, so check them every 2-3 days. In cooler climates, give them extra time—sometimes up to 10 days beyond visual cues.
And remember, once you’ve picked, store them in a cool, dry place (50–55°F) to extend their freshness for weeks.