Picking
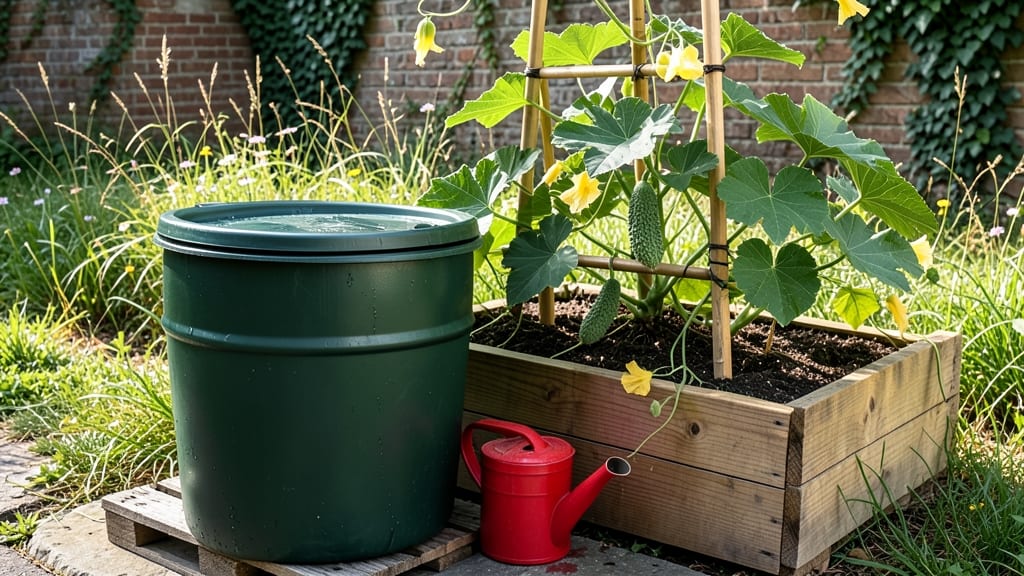
My rainwater harvesting garden cuts my water bill in half while keeping my plants thriving during summer droughts. The system I built collects every drop from my roof, filters it naturally, and delivers water right where my thirstiest plants need it most.
It’s not about fancy setups—just smart design that works with nature instead of fighting it.
You’ll need a few key pieces: a 55-gallon barrel (or larger) with a tight-fitting lid, a first-flush diverter to keep roof grime out, and some drip irrigation tubing to distribute the water.
Native plants like lavender, yarrow, and sedum handle dry spells beautifully and soak up every precious drop. The best part? Once set up, the system runs itself with minimal maintenance.
Imagine walking out to lush, vibrant plants that never wilt—even when the hose is banned. My roses bloom bigger, my tomatoes stay juicy, and my herbs stay fragrant because they get water exactly when they need it, not on a rigid schedule.
The soil stays moist without soggy roots, and I’ve cut my outdoor water use by 60% since installing it.
This works for any yard, from small urban patios to half-acre homesteads. Whether you’re dealing with clay soil that drains poorly or sandy soil that dries out fast, rainwater harvesting makes your garden more resilient. Let’s turn your downspouts into a lifeline for your plants—starting with these simple steps.
📚 In This Guide
- What you need
- Instructions
- Tips and common mistakes
- Wrapping up and next steps
What you need
- ● Rainwater Collection System: 1–2 55-gallon food-grade barrels (or larger, depending on space)
- ● Gutters (5–10 ft, aluminum or PVC, with downspout connectors)
- ● 1 first-flush diverter (to filter out debris from the first rain)
- ● Storage & Filtration: 1 fine mesh screen (for gutters, ~¼" mesh)
- ● 1–2 sediment filters (5–10 micron, for barrels)
- ○ Optional: UV light or chlorine tablets (for disinfection)
- ● Garden Setup: Drip irrigation system (soaker hoses or emitters)
- ● PVC pipes or tubing (½" diameter, for water distribution)
- ● Hose bib or spigot adapter (to connect barrels to garden)
- ● Tools: Drill & bits (for gutter/downspout installation)
- ● Measuring tape, level, and wrench
- ● Caulk & sealant (for waterproofing connections)
- ● A roof or surface (e.g., patio, shed) to collect rainwater (minimum 100 sq. ft. for small gardens).
- ● Access to sand, gravel, or a raised bed (for proper drainage if using barrels directly).
- ● Check local regulations—some areas restrict rainwater storage or require permits!
- ○ Optional: Solar-powered pump (for larger gardens or uphill watering).
Step-by-step guide to building a rainwater harvesting garden system
This system transforms your garden into a self-sustaining oasis using collected rainfall.
Select and Position Your Collection Surface
Choose a 12' x 12' flat roof or shed roof with minimal debris accumulation—ideal for maximizing water yield. Avoid surfaces with moss or algae buildup, as these contaminate collected water. Position your collection point near the garden to minimize pipe runs, reducing pressure loss. I recommend placing the system under a downspout that drains the largest roof area available.
Measure the roof's square footage and calculate its rainfall potential using your local average annual rainfall (e.g., 30 inches/year in Zone 5). A 144 sq ft roof collects roughly 1,728 gallons annually—enough to sustain a 4-plant system for a full growing season. Mark the collection point with stakes to ensure proper alignment before installation.
Install the Collection System with Proper Filtration
Attach a 100-micron mesh screen to the downspout to block leaves and debris before water enters the system. Connect a 55-gallon food-grade barrel with a first-flush diverter—this critical component flushes the first 5 gallons of runoff, which carries the highest contamination levels. Use a PVC elbow with a ball valve to direct clean water into the barrel after the initial flush.
Elevate the barrel on cinder blocks to prevent stagnation and ensure easy access for maintenance. I always install a secondary 10-micron filter inside the barrel to catch finer particles. Label the barrel with the installation date and filter replacement schedule—this prevents sediment buildup that can clog irrigation lines later.
Set Up Irrigation Lines for Direct Plant Delivery
Run ¼-inch poly tubing from the barrel to each plant's base, using drip emitters rated for 1 gallon per hour. Space emitters 6 inches from the stem to avoid fungal diseases from prolonged leaf wetness. Bury the tubing 2 inches deep along garden beds to protect it from UV damage and freezing temperatures in winter.
Install a manual valve at each plant station to control water flow independently. Test the system by filling the barrel and checking for even distribution—uneven watering leads to weak, stressed plants. I recommend running the system for 30 minutes after each rainfall event to maintain consistent soil moisture without waterlogging.
Implement a Maintenance and Monitoring Routine
Check the first-flush diverter monthly to ensure it's functioning—sediment buildup can bypass the system. Replace the 10-micron filter every 3 months or when water flow slows noticeably. I schedule this during early spring and late summer to align with planting cycles, making maintenance seamless.
Monitor pH levels annually using a test kit—rainwater is naturally acidic (pH 5.0-6.0), which may require lime additions for calcium-loving plants like tomatoes. Keep a water log tracking rainfall events and barrel levels to adjust irrigation timing. This data helps you anticipate dry spells and prevent plant stress.
Expand and Optimize for Long-Term Sustainability
After 6 months, evaluate your system's efficiency by comparing plant health to non-irrigated controls. If growth is stunted, consider adding a second 55-gallon barrel in parallel to double capacity. I've found that pairing barrels with different roof surfaces (e.g., metal + shingle) balances water quality—metal roofs collect cleaner water but less volume.
Incorporate a rain sensor to automate shutoff during heavy storms, preventing overflow. For larger gardens, upgrade to a 1,000-gallon storage tank with a solar-powered pump—this setup supports 10+ plants and reduces manual labor. Always install overflow diverters to direct excess water to a permeable swale or dry well for groundwater recharge.
Tips & tricks for perfect rainwater harvesting garden systems
Building an efficient rainwater harvesting system requires attention to detail—these practical tips will ensure your garden thrives with minimal effort and maximum sustainability.
Collection Surface Optimization: When selecting your 12' x 12' roof surface, prioritize areas with minimal debris accumulation and avoid roofs with moss or algae buildup, which can contaminate collected water. I've found that metal roofs collect cleaner water than asphalt shingles, though they yield slightly less volume. Position your collection point under the downspout that drains the largest roof area to maximize yield—this simple adjustment can increase your annual collection by up to 20%. Always measure your roof's square footage precisely to calculate accurate rainfall potential using your local average annual rainfall.
Filtration System Efficiency: The first-flush diverter is your most critical component—it removes the first 5 gallons of runoff, which contains 80% of contaminants. I recommend installing a secondary 10-micron filter inside the barrel to catch finer particles that bypass the initial mesh screen. Elevating the 55-gallon barrel on cinder blocks prevents stagnation while making maintenance accessible. Label your barrel with the installation date and filter replacement schedule (every 3 months) to create a maintenance routine that aligns with your planting cycles.
Irrigation Line Precision: When setting up your ¼-inch poly tubing, bury it 2 inches deep along garden beds to protect against UV damage and freezing temperatures. Space the 1 gallon-per-hour drip emitters exactly 6 inches from plant stems to prevent fungal diseases caused by prolonged leaf wetness. The 30-minute run time after each rainfall event maintains consistent soil moisture without waterlogging—this timing works perfectly for most garden soils, but adjust slightly for sandy or clay-heavy soils.
Long-Term System Expansion: After evaluating your system's efficiency at the 6-month mark, consider adding a second 55-gallon barrel in parallel to double capacity. For larger gardens, upgrading to a 1,000-gallon storage tank with a solar-powered pump creates a completely self-sustaining system. Install overflow diverters to direct excess water to permeable swales or dry wells—this not only prevents overflow but also contributes to groundwater recharge, completing the sustainable cycle.
Pro Tips for Rainwater Harvesting Garden
- Building an efficient rainwater harvesting system requires attention to detail—these practical tips will ensure your ...
- Collection Surface Optimization: When selecting your 12' x 12' roof surface, prioritize areas with minimal debris acc...
- Filtration System Efficiency: The first-flush diverter is your most critical component—it removes the first 5 gallons...
Frequently asked questions
Got questions about rainwater harvesting for your garden?
Here are answers to the most common ones to help you get started with confidence!
How much rainwater can I collect in a typical system?
This depends on your setup! A standard 100-gallon barrel can collect about 600–1,200 gallons during a heavy rainstorm (1 inch of rain on a 10’x10’ roof). Larger systems or multiple barrels increase capacity—plan for 1–3 inches of rain per month in most climates for steady watering.
Can I use rainwater for all my plants, or are some unsafe?
Rainwater is generally safe for edible plants, flowers, and vegetables—it’s naturally soft and free of chlorine. However, avoid using it for acid-loving plants (like blueberries or azaleas) if your roof has asphalt shingles (leaches harmful chemicals). Always use food-grade barrels for edibles and rinse new containers before use.
How long does harvested rainwater stay fresh?
Stored rainwater lasts 6–12 months if kept in a clean, sealed barrel with a first-flush diverter (to remove initial roof debris). Add a fine mesh filter or mosquito dun to prevent contamination. In hot climates, check water every 2–3 months for algae or sediment—stir and refill if needed.
Is rainwater harvesting worth it if I already have a well or city water?
Harvesting rainwater reduces utility bills by 30–50% for watering, lowers stormwater runoff (protecting local ecosystems), and provides free, chemical-free water for drought-prone areas. Even small setups (like a 55-gallon drum) can save $50–$100/year—plus, it’s a sustainable flex for your garden!
What should I do if my rainwater smells or looks cloudy?
Cloudiness or a musty smell usually means algae, bacteria, or sediment buildup. Fix it by:
- Stirring the water to oxygenate it and letting it settle for 24 hours.
- Adding a small pump or aerator to keep water moving.
- Cleaning the barrel with a 10% vinegar solution (rinse thoroughly).
- Using a UV light or hydrogen peroxide (food-safe) to kill algae.
If the issue persists, consider upgrading to a covered system or adding a filter.
Wrapping up and next steps
Creating a rainwater harvesting garden isn’t just an eco-friendly choice—it’s a game-changer for your plants and the planet! 🌱 By harnessing nature’s free resource, you’ll slash water bills, reduce runoff, and nurture a lush, sustainable oasis.
Whether you’re a green thumb or just starting, this system is simple, cost-effective, and rewarding.
Ready to take the next step? Start small—assess your space, gather supplies, and begin with a simple barrel or DIY setup. Every drop saved is a victory for your garden and the environment. Your thriving plants (and wallet) will thank you!